Every program in this book so far has lived in a terminal. That’s a fine place for automation, but it’s not where most people spend their time. They live in web browsers. If you want to build something your friends, family, or colleagues can use without installing Python or typing commands, the web is the natural home for it.
That might sound like a huge leap, a whole new world of servers and frameworks. It’s smaller than it looks. A web app is just a Python program that waits for requests and answers them with web pages. You already know how to write functions, read and save JSON, handle bad input, and organise a project into files. In this chapter, you’ll connect those skills to a web browser using Flask, one of the friendliest web frameworks in any language. We’ll start with what actually happens when you visit a web page, and what people mean by the backend and the frontend. Then you’ll build pages with Flask routes and templates, handle forms, check what people type, and save it. By the end, you’ll have a small but real expense tracker that runs in your browser.
#What a web app really is
You’ve used web apps thousands of times. Here’s what’s actually going on when you do.
When you type an address into your browser and press Enter, the browser sends a request across the internet to a computer called a server. It’s the same idea as the API requests in Chapter 19: a message asking for something at a particular URL. The server runs a program, which works out what to send back, and replies with a response. With an API, the response was JSON for a program to read. With a web app, the response is usually HTML, the language that describes web pages: headings, paragraphs, tables, forms, buttons. The browser reads that HTML and draws the page you see.
Click a link, and the whole thing happens again: request, response, new page. Fill in a form and press Save, and the browser sends your answers along with the request. The server program reads them, perhaps saves them, and responds with the next page.
That’s a web app. A program that receives requests and returns pages. Everything else is detail.
For learning, both the browser and the server will be on your own computer. Flask comes with a small built-in server for development, and you’ll visit your app at an address like http://127.0.0.1:5000/, where 127.0.0.1 (also called localhost) is a special address that always means “this computer,” and 5000 is the port, a numbered door on the computer that your app listens at.
#Backend vs frontend (plain English)
You’ll hear these two words constantly, so let’s pin them down with the restaurant from Chapter 19.
The frontend is the dining room: everything the customer sees and touches. In a web app, it’s the HTML that describes the page, the CSS that makes it look nice (colours, fonts, spacing), and sometimes JavaScript, which makes parts of the page interactive without reloading. The frontend runs in the browser.
The backend is the kitchen: where orders are received, decisions are made, and data is stored. In our web app, the backend is the Python program. It decides which page to show, checks the data people send, and reads and writes files. The backend runs on the server. Figure 25.1 shows how the two work together for a single page visit.
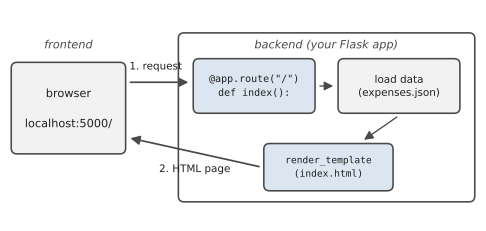
This book is about Python, so we’ll focus on the backend. You’ll write a little HTML too, because the backend has to produce pages, but you won’t need to become a designer. A few lines of CSS will make things look tidy enough.
#Flask basics
Flask isn’t part of the standard library, so start by making a new project folder with a virtual environment (Chapter 23), and install it:
pip install flask
Here’s a complete web app:
1# hello_app.py - the smallest useful Flask app
2from flask import Flask
3
4app = Flask(__name__)
5
6
7@app.route("/")
8def home():
9    return "<h1>Hello from Flask!</h1><p>Your first web app.</p>"
10
11
12if __name__ == "__main__":
13    app.run(debug=True)
Run it like any Python file, and you’ll see something like this in the terminal:
 * Serving Flask app 'hello_app'
 * Debug mode: on
 * Running on http://127.0.0.1:5000
Press CTRL+C to quit
Your program is now a server, sitting and waiting for requests. Open your browser and go to http://127.0.0.1:5000. You’ll see your heading. Look back at the terminal, and you’ll see a line logging the request your browser just made. When you’re finished, press Ctrl+C in the terminal to stop the server.
Let’s go through the code. Flask(__name__) creates the app. The line starting with @ is new. It’s called a decorator, and @app.route("/") means “when someone visits the address /, run the function below.” The function’s job is to return the page, here a string of HTML. That pairing of an address with a function is called a route, and a web app is mostly a collection of routes.
debug=True turns on two helpful things while you’re developing. The server restarts automatically whenever you save a change to your code, and if your code crashes, the browser shows a detailed traceback instead of a bare error page. Never use debug mode for an app other people can reach over a network, though, because that error page can reveal more about your code than you’d like.
Adding more pages is just adding more routes:
1@app.route("/about")
2def about():
3    return "<p>Made while reading Hands-On Python.</p>"
Now http://127.0.0.1:5000/about shows that page. Routes can even take part of the address as an argument, so @app.route("/hello/<name>") with a function def hello(name): would greet whoever’s name is in the URL.
#Routes and templates
Putting HTML inside Python strings is fine for a heading or two. A real page, though, has dozens of lines of HTML, and once that’s mixed into your Python, neither is easy to read. Flask’s answer is templates: HTML files with gaps in them, which Python fills in. If you did the Word templates in Chapter 17, it’s the same idea for web pages.
Templates go in a folder called templates, next to your app. Flask fills them in using a small template language called Jinja, which has two kinds of marker. Double curly braces, {{ ... }}, put a value into the page. Curly braces with percent signs, {% ... %}, are for logic like loops and if statements. Here’s a small template, templates/greeting.html:
1<h1>Hello, {{ name }}!</h1>
2<ul>
3  {% for item in todo %}
4    <li>{{ item }}</li>
5  {% endfor %}
6</ul>
And the route that uses it:
1from flask import Flask, render_template
2
3app = Flask(__name__)
4
5
6@app.route("/")
7def home():
8    tasks = ["water the plants", "call Omar", "finish chapter 24"]
9    return render_template("greeting.html", name="Sara", todo=tasks)
render_template() finds the file in the templates folder, fills the gaps with the values you pass as named arguments, and returns the finished HTML. The {% for %} loop works like a Python for loop, giving one <li> line per task. It needs {% endfor %} to mark the end, because HTML doesn’t care about indentation the way Python does.
Jinja quietly protects you from a nasty problem, too. Suppose someone types <script> into one of your forms, and you show what they typed on a page. A careless app would let that text run as code in every visitor’s browser. Jinja escapes anything you insert with {{ }}, turning < into a harmless symbol, so whatever people type is shown as text and never run.
Most sites have parts that appear on every page: a heading, a navigation bar, a link to a stylesheet. Rather than copying those into every template, Jinja lets one template extend another. You write a base layout once, with a named gap called a block, and each page fills in just that gap. You’ll see this in the project.
Finally, styling. Files that never change, like CSS stylesheets and images, go in a folder called static. In a template, you link to them with url_for('static', filename='style.css'), which builds the right address for you. In general, url_for() turns a route’s function name into its URL, so if you ever change an address, the links update themselves.
#Handling form input
So far our pages only show information. To let people send information, you need a form. A form is a piece of HTML with input boxes and a button:
1<form method="post">
2  <input name="item">
3  <button type="submit">Save</button>
4</form>
When someone presses the button, the browser sends a new request to the same address, but with a different method. Until now, every request has been a GET, which means “please show me something.” A form with method="post" sends a POST request, which means “here’s some information for you.” The information travels with the request, labelled by each input’s name.
A Flask route can accept both kinds of request and check which one it got:
1from flask import request
2
3
4@app.route("/add", methods=["GET", "POST"])
5def add():
6    if request.method == "POST":
7        item = request.form.get("item", "").strip()
8        # ... check it and save it ...
9    return render_template("add.html")
request.form works like a dictionary of everything the form sent. Use .get() with a default, since a missing field shouldn’t crash your app.
Everything you learned in Chapter 8 about validation applies here, even more so. On the web, you can’t trust input at all. People leave boxes empty, type letters into number fields, and occasionally send deliberately strange data. Check everything on the backend, and if something’s wrong, show the form again with a clear message and with what they typed still in the boxes, so they only have to fix the mistake, not start over.
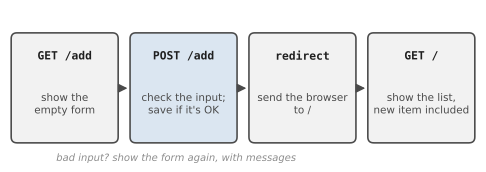
Once the data is valid and saved, there’s one more professional habit: instead of showing a page directly, redirect the browser to another address. That’s the pattern in Figure 25.2, called Post/Redirect/Get. Without it, if someone refreshes the page after saving, the browser sends the POST again, and the same expense gets saved twice. With it, a refresh just reloads the list.
Ama found this out the morning after she launched a sign-up page for her running club’s charity 5K. Her little Flask app showed a “Thanks, you’re registered!” page straight after saving each entry. By breakfast the list had 140 names on it, and only 96 different people. Anyone who’d refreshed the thank-you page, or pressed Back and then Forward, had been signed up again. One enthusiastic runner was on the list four times. A one-line change, returning redirect(url_for("thanks")) instead of the page itself, stopped it happening, and a short script with a set of email addresses cleaned up the duplicates.
#Project: Small but Real Python Web App
Let’s build Pocket Expenses, a little expense tracker you use in a browser. It shows a list of your expenses with totals by category, and has a form for adding new ones that checks the input properly. Expenses are saved to a JSON file, so they’re still there tomorrow. Here’s the project layout:
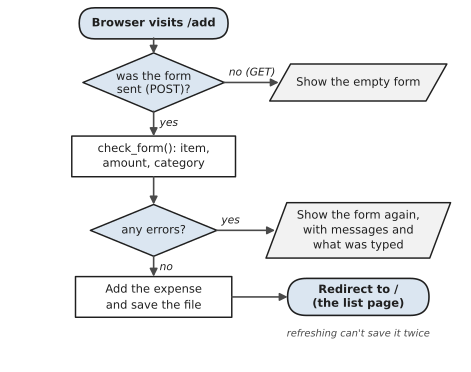
Most of the app is simple: each page is a function that loads some data and fills in a template. The one part with real decisions in it is the /add page, which has to show a form, check what was typed, and either save it or explain what’s wrong. Figure 25.3 shows those decisions. Keep it in mind when you reach the add() function in app.py.
pocket_expenses/
    app.py
    templates/
        base.html
        index.html
        add.html
    static/
        style.css
    data/
        expenses.json     (created automatically)
Start with the Python, app.py:
1# app.py - a small expense tracker you use in a web browser
2import json
3from datetime import date
4from pathlib import Path
5
6from flask import Flask, redirect, render_template, request, url_for
7
8HERE = Path(__file__).parent
9DATA_FILE = HERE / "data" / "expenses.json"
10CATEGORIES = ["food", "transport", "home", "fun", "other"]
11
12app = Flask(__name__)
13
14
15def load_expenses():
16    if not DATA_FILE.exists():
17        return []
18    return json.loads(DATA_FILE.read_text(encoding="utf-8"))
19
20
21def save_expenses(expenses):
22    DATA_FILE.parent.mkdir(exist_ok=True)
23    text = json.dumps(expenses, indent=2, ensure_ascii=False)
24    DATA_FILE.write_text(text, encoding="utf-8")
25
26
27def check_form(form):
28    """Return (expense, errors). errors is empty if all is well."""
29    errors = []
30    item = form.get("item", "").strip()
31    if not item:
32        errors.append("Please say what you bought.")
33    try:
34        amount = round(float(form.get("amount", "")), 2)
35        if amount <= 0:
36            errors.append("The amount must be more than zero.")
37    except ValueError:
38        amount = None
39        errors.append("The amount must be a number, like 4.50.")
40    category = form.get("category", "")
41    if category not in CATEGORIES:
42        errors.append("Please choose a category from the list.")
43    expense = {"item": item, "amount": amount, "category": category,
44               "date": date.today().isoformat()}
45    return expense, errors
46
47
48@app.route("/")
49def index():
50    expenses = load_expenses()
51    totals = {}
52    for e in expenses:
53        totals[e["category"]] = totals.get(e["category"], 0)
54        totals[e["category"]] += e["amount"]
55    grand_total = sum(totals.values())
56    return render_template("index.html", expenses=expenses,
57                           totals=totals, grand_total=grand_total)
58
59
60@app.route("/add", methods=["GET", "POST"])
61def add():
62    errors, form = [], {}
63    if request.method == "POST":
64        form = request.form
65        expense, errors = check_form(form)
66        if not errors:
67            expenses = load_expenses()
68            expenses.append(expense)
69            save_expenses(expenses)
70            return redirect(url_for("index"))
71    return render_template("add.html", errors=errors, form=form,
72                           categories=CATEGORIES)
73
74
75if __name__ == "__main__":
76    app.run(debug=True)
Look at how familiar most of this is. load_expenses() and save_expenses() are the JSON saving from Chapter 20. check_form() is pure validation, like Chapter 8, collecting every problem into a list so the person sees all their mistakes at once rather than one at a time. The routes are short, because they only coordinate: get the data, call a function, choose a page. The add() route handles both the GET (show an empty form) and the POST (check, then either save and redirect, or show the form again with the errors and the person’s answers).
Now the templates. First the shared layout, templates/base.html:
1{# templates/base.html - shared layout for every page #}
2<!doctype html>
3<html lang="en">
4<head>
5  <meta charset="utf-8">
6  <title>Pocket Expenses</title>
7  <link rel="stylesheet"
8        href="{{ url_for('static', filename='style.css') }}">
9</head>
10<body>
11  <header>
12    <h1><a href="{{ url_for('index') }}">Pocket Expenses</a></h1>
13  </header>
14  <main>
15    {% block content %}{% endblock %}
16  </main>
17</body>
18</html>
{# ... #} is a Jinja comment, a note that never appears in the finished page. The rest is the standard skeleton of an HTML page. The important line is {% block content %}{% endblock %}, the gap each page fills in.
The list page, templates/index.html, extends the base and fills that block:
1{# templates/index.html - the list of expenses #}
2{% extends "base.html" %}
3{% block content %}
4  <p>
5    <a class="button" href="{{ url_for('add') }}">
6      + Add an expense</a>
7  </p>
8
9  {% if expenses %}
10    <table>
11      <tr>
12        <th>Date</th><th>Item</th><th>Category</th><th>Amount</th>
13      </tr>
14      {% for e in expenses %}
15        <tr>
16          <td>{{ e.date }}</td>
17          <td>{{ e.item }}</td>
18          <td>{{ e.category }}</td>
19          <td class="money">${{ "%.2f"|format(e.amount) }}</td>
20        </tr>
21      {% endfor %}
22    </table>
23
24    <h2>Totals</h2>
25    <ul>
26      {% for category, total in totals.items() %}
27        <li>{{ category }}: ${{ "%.2f"|format(total) }}</li>
28      {% endfor %}
29    </ul>
30    <p><strong>
31      Everything: ${{ "%.2f"|format(grand_total) }}
32    </strong></p>
33  {% else %}
34    <p>No expenses yet. Add your first one!</p>
35  {% endif %}
36{% endblock %}
Inside templates, Jinja lets you write e.date as a shortcut for e["date"]. "%.2f"|format(e.amount) formats a number to two decimal places; the | passes a value through a filter, a small function that changes how it’s displayed. And {% if %} ... {% else %} ... {% endif %} shows a friendly message when the list is empty.
The form page, templates/add.html:
1{# templates/add.html - the form for a new expense #}
2{% extends "base.html" %}
3{% block content %}
4  <h2>Add an expense</h2>
5
6  {% for message in errors %}
7    <p class="error">{{ message }}</p>
8  {% endfor %}
9
10  <form method="post">
11    <label>What did you buy?
12      <input name="item" value="{{ form.get('item', '') }}">
13    </label>
14    <label>How much? ($)
15      <input name="amount" value="{{ form.get('amount', '') }}">
16    </label>
17    <label>Category
18      <select name="category">
19        {% for c in categories %}
20          {% set chosen = form.get('category') == c %}
21          <option {{ "selected" if chosen }}>{{ c }}</option>
22        {% endfor %}
23      </select>
24    </label>
25    <button type="submit">Save</button>
26  </form>
27{% endblock %}
Each input’s value is filled from form, which is empty the first time and holds the person’s answers if they made a mistake. That’s how their typing survives a failed attempt. The category list is a <select>, a drop-down menu, built from the same CATEGORIES list the Python code checks against, so the two can never disagree. {% set %} makes a little variable inside the template, and "selected" if chosen marks the option they picked last time.
Finally, a little style in static/style.css:
1/* static/style.css - just enough style to look tidy */
2body { font-family: system-ui, sans-serif; max-width: 640px;
3       margin: 2rem auto; padding: 0 1rem; color: #222; }
4header a { color: inherit; text-decoration: none; }
5table { width: 100%; border-collapse: collapse; }
6th, td { text-align: left; padding: 0.4rem;
7         border-bottom: 1px solid #ddd; }
8.money { text-align: right; }
9label { display: block; margin: 0.8rem 0; }
10input, select { display: block; padding: 0.4rem; width: 100%; }
11.button, button { background: #2f5d8a; color: white;
12                  padding: 0.5rem 1rem; border: none;
13                  border-radius: 4px; text-decoration: none; }
14.error { color: #a40000; }
CSS is a whole subject of its own, and we won’t go into it here. Each rule picks some elements and says how they should look: fonts, widths, spacing, colours. Change a few values and refresh the page to see what they do.
Run app.py, open http://127.0.0.1:5000, and you’ll see “No expenses yet.” Click + Add an expense, leave the item empty, type lots for the amount, and press Save. The form comes back with two clear messages, and your lots is still sitting in the box. Fix the mistakes and save, and you’re sent back to the list, now showing your expense and the totals. Stop the server, start it again, and your expenses are still there, read from data/expenses.json.
You’ve built a real web application: routes, templates, a form with proper validation, and saved data. It’s a small one, but it has the same bones as the web apps you use every day.
Some ways to extend it:
- Add a delete button next to each expense. (Hint: a small form with
method="post"that sends the expense’s position to a/delete/<int:index>route.) - Add a
/category/<name>route that shows only one category’s expenses. - Show a bar chart of the totals, by generating a PNG with matplotlib and saving it in the
staticfolder.
Before you share it, one warning. Flask’s built-in server is meant for trying things out on your own computer, not for a public website. When you’re ready to put an app online, the usual route is a hosting service that runs Python web apps; the Flask documentation has a good section on deploying.
In the next chapter, we’ll take our final new step, into machine learning, and teach a program to make predictions from data.
#On the Job
How it shows up at work: A lot of professional Python runs on web servers: company websites, internal dashboards, admin pages and, most of all, the APIs that phone apps and other programs talk to. Plenty of companies run Flask in production, and many developers learn it before moving on to Django or FastAPI. Even if you never build a public website, someone at work will ask for “a little page where the team can upload their timesheets.” It happens more often than you’d think.
What employers expect: You understand the request-and-response cycle, GET and POST, routes, templates and forms. You check everything on the server, use Post/Redirect/Get, and never trust what users type. You know the development server isn’t for production, and that real apps keep their data in a database, not a JSON file. If you can build a small JSON API endpoint, that’s a real plus, since that’s what most backend work looks like day to day.
Interview questions you might meet:
- “What happens when you type a web address and press Enter?” The browser sends a request to a server, the server runs some code (in Flask, the function for that route), and sends back a response, usually HTML, which the browser displays.
- “What’s the difference between GET and POST?” GET asks for a page or data and shouldn’t change anything. POST sends data, like a form, to be stored or acted on.
- “What is Post/Redirect/Get, and why use it?” After handling a POST, redirect to a GET page, so refreshing doesn’t submit the form again. Ama’s 5K is a good story for this.
- “How does Jinja protect against people typing code into forms?” It escapes values inserted with
{{ }}, so text like<script>is shown, not run. This attack is called cross-site scripting, or XSS. - “Frontend or backend: where should validation happen?” Always on the backend. Frontend checks are a convenience for users; anyone can bypass them.
Portfolio task: Push the expense tracker web app, including a screenshot of it running in the README. If you can, deploy it to a free hosting service for Python apps and put the link at the top of the README. A live link that a hiring manager can click is worth a great deal, and following a host’s deployment guide is good practice in itself.
Professional habit: Every time you add a form, try to break it before anyone else does: submit it empty, put letters in number fields, paste in a thousand characters, and type <b>hello</b>. Fix whatever goes wrong.
#Exercises
Solutions are in solutions/chapter_25 in the book’s GitHub repository. To keep each solution in a single file, they use render_template_string, which takes a template as a string instead of a file in a templates folder. In your own apps, keep templates in files as this chapter did. Run a solution with Python and open http://127.0.0.1:5000 in your browser.
Warm-up
Exercise 25.1. Write a Flask app with three routes, /, /about and /contact, each returning a short page. Add links between them.
Exercise 25.2. Add a route /hello/<name> that greets whoever’s name is in the address, so /hello/Sara shows Hello, Sara!. What happens if you visit /hello/<b>Sara</b>?
Exercise 25.3. Write a route that shows today’s date and time, using a template with a {{ }} placeholder. Refresh the page and watch it change.
Practice
Exercise 25.4. Pass a list of five books to a template and display them as a bulleted list using a Jinja {% for %} loop. Show No books yet if the list is empty, using {% if %}.
Exercise 25.5. Build a tip calculator page: a form with a bill amount and a tip percentage. When it’s submitted, show the tip and the total on the same page. Show a friendly message if either box isn’t a number.
Exercise 25.6. Add a route /api/books that returns your book list as JSON instead of HTML, using Flask’s jsonify. Visit it in your browser and look at the result.
Exercise 25.7. Make a custom “page not found” page with @app.errorhandler(404), so mistyped addresses show something friendly with a link back home.
Challenge
Exercise 25.8. Ama’s sign-up form, done right. Build a form with a name and an email address. Validate both (name not empty, email containing @), keep what was typed when there’s an error, refuse an email that’s already registered, save registrations to a JSON file, and use Post/Redirect/Get to send people to a thank-you page.
Exercise 25.9. Add a /registrations page to Exercise 25.8 that shows how many people have signed up and lists their names (but not their emails) in alphabetical order.
Exercise 25.10. Use Flask’s test client to write two pytest tests for Exercise 25.8: one that posts a valid registration and checks for a redirect (status code 302), and one that posts an empty name and checks that the error message appears. (client = app.test_client(), then client.post("/", data={...}).)