#Installing Python (Windows, macOS, Linux)
Installation is the part everyone worries about, mostly because it sounds technical. “Setting up a development environment” makes it sound like a job for someone in a lab coat. It isn’t. You’re installing a program, the same way you’d install a web browser or a note-taking app, and your computer has done that hundreds of times before.
Whatever computer you have, Windows, macOS, or Linux, the goal is the same: get Python onto it, and make sure the computer knows where to find it. If something goes wrong along the way, that’s not a verdict on you. Experienced programmers search the web for installation problems all the time; they just don’t mention it.
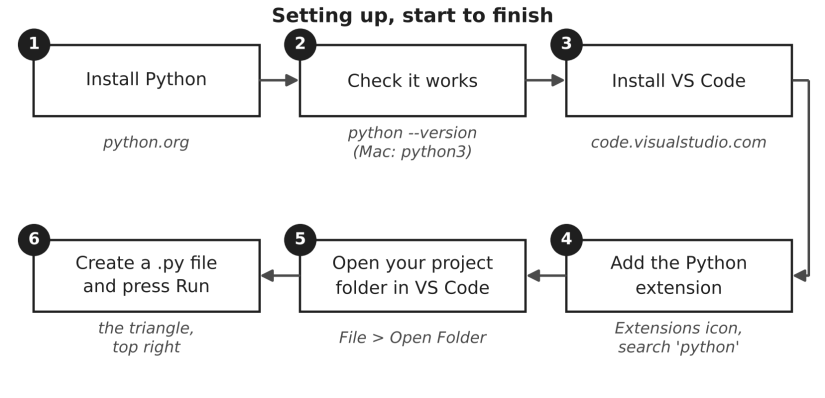
Before you click anything, look at the whole journey in Figure 2.1. There are six steps, and you’ll do them once. Websites and installers change their look every year or so, which is why the map shows the steps rather than the buttons. If a screen in front of you doesn’t match a picture in this chapter, find where you are on the map, and look for a button that does the same job.
Three words will keep coming up, so here they are in plain English:
- An installer is a program whose only job is to put another program on your computer. You run it once and then forget about it.
- A terminal is a window where you type instructions to your computer instead of clicking. On Windows it’s called Command Prompt (or PowerShell), and on a Mac it’s called Terminal. It looks old-fashioned, but it’s just another app.
- The PATH is a list your computer keeps of the places where programs live. When you type
python, the computer checks every place on that list. If Python’s folder isn’t on it, the computer says it’s never heard of Python, even though it’s installed. Most setup trouble on Windows comes down to this one list.
Windows
Windows offers two ways in, and both work for everything in this book.
The Python install manager (recommended): This is the newer, simpler route, and it’s what python.org now points Windows users to first.
- Open your browser, type python.org into the address bar (1 in Figure 2.2), and point at Downloads (2). The site recognises Windows and offers the Python install manager (3). Click it. You can also get the same thing by searching for “Python Install Manager” in the Microsoft Store. Be careful to use python.org itself, not a look-alike site from a search advert.
- Run the download and click Install.
- Open a terminal (we’ll show you how in a moment) and type
python. The first time you do this, the install manager notices you don’t have Python yet and downloads the latest version for you. If it asks whether to add a folder to your PATH, say yes. That’s how Windows remembers where Python lives.
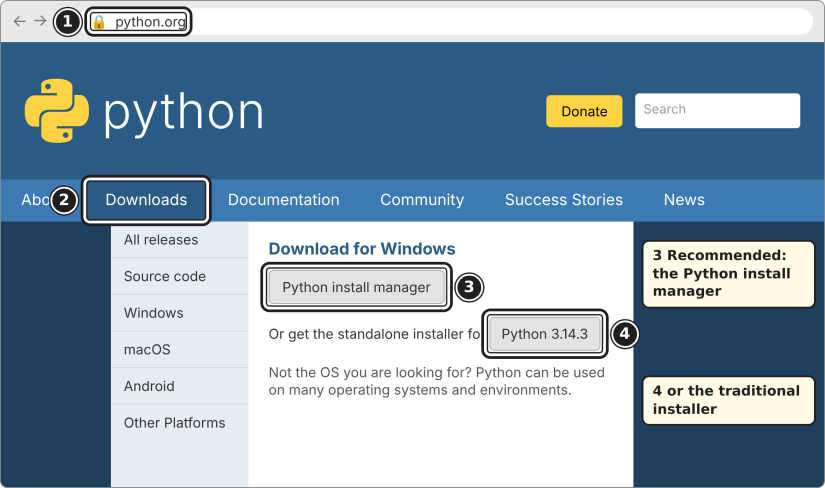
The traditional installer: For years this was the only option, and you’ll still see it in tutorials all over the web. It’s available for current versions of Python, though python.org plans to stop offering it from Python 3.16 onwards.
- On python.org’s Downloads page, click the button with the version number on it (4 in Figure 2.2) and download the
.exefile. Choose the newest version unless a course or a colleague tells you otherwise. - Double-click it to run it.
- On the very first screen, before anything else, tick Add python.exe to PATH at the bottom (1 in Figure 2.3). Of all the steps in this chapter, this is the one people most often miss.
- Then click Install Now (2). The default settings are exactly right for a beginner. Windows may ask, “Do you want to allow this app to make changes to your device?” Click Yes. That’s Windows checking with you, not a warning that something is wrong.
- When it says “Setup was successful” (Figure 2.4), click Disable path length limit if you see it; it prevents some odd problems with long folder names later. Then click Close.
Whichever route you took, let’s check it worked. For that we need the Command Prompt, a window where you talk to your computer by typing instead of clicking. You’re not programming yet; you’re just asking it a question.
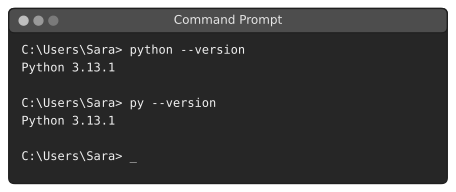
On Windows, click the Start button (or press the Windows key), type cmd, and press Enter. A black window appears with a blinking cursor and a line that looks something like C:\Users\Sara>. That line is called the prompt. It’s the computer saying, “I’m listening.” Type this and press Enter:
python --version
If everything went well, you’ll see a reply such as Python 3.13.1. Your number may be different, and that’s fine. Anything that starts with a 3 works for every example in this book. Have a look at Figure 2.5 to see what a happy result looks like.
If instead you see a message saying that python is not recognized, or the Microsoft Store opens, don’t reinstall anything yet. Follow Figure 2.6 from the top.
The py command comes with both installation routes, and it often works even when python doesn’t. If py answers, you’re ready, and you can use py wherever this book says python. If neither works, the cause is almost always the PATH. Here’s how to fix it:
- You used the traditional installer: run it again, choose Modify, and tick Add Python to environment variables.
- You used the install manager: open the Start menu, search for Manage app execution aliases, and make sure the Python entries are switched on.
- Either way: close every Command Prompt window and open a fresh one. A terminal only reads the PATH when it starts, so an old window won’t notice your fix. This catches experienced people too.
macOS
Macs are a little sneaky here. Some versions of macOS already have a python3 command lurking around, but it’s often an old copy, or a placeholder that asks to install developer tools when you touch it. We’d rather you have a fresh, proper install that you control.
- Open your browser and go to python.org, then click Downloads. The site recognises macOS and offers a download for it.
- Download the installer. It’s a
.pkgfile, the same kind of file you’ve probably used to install other Mac apps. - Double-click the file and click through the screens: Continue, Continue, Agree, Install. Your Mac will ask for your password. That’s normal.
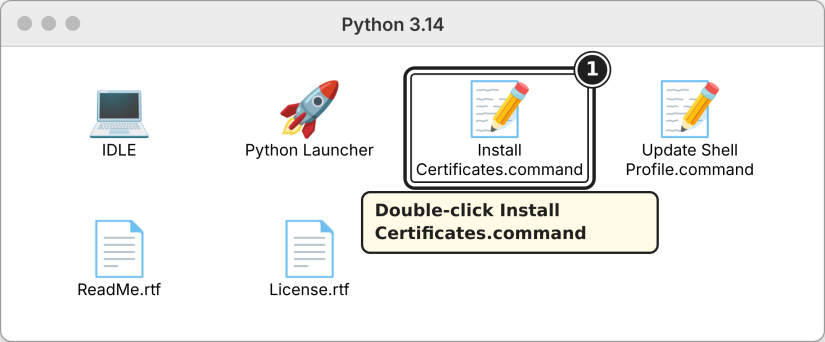
- When it finishes, a Finder window opens showing a folder called Python 3.x (Figure 2.7). Inside it, double-click Install Certificates.command. A Terminal window flashes some text and closes or says it’s done. This small step lets Python download things securely later, and skipping it causes confusing errors in Chapter 19. If the window didn’t open, you’ll find the same folder inside your Applications folder.
To check that it worked, open the Terminal app. The quickest way is to press Command and Space together, type Terminal, and press Enter. Then type:
python3 --version
Notice the 3 on the end. On a Mac, the command is python3, not python. You’ll see a version number come back, and that’s your green light.
Linux
If you use Linux, there’s a good chance Python is already installed, because many parts of Linux itself are written in Python. Open a terminal and type python3 --version. If a version number appears, you’re done with installation.
If it isn’t there, or if you’re on Ubuntu or Debian and want the extra pieces we’ll use later in the book, run:
sudo apt update
sudo apt install python3 python3-pip python3-venv
The sudo part asks for your password because you’re installing software for the whole system. On Fedora, the equivalent is sudo dnf install python3 python3-pip. Other distributions have their own package managers, but the idea is identical: ask the package manager for python3.
#Verifying installation
You’ve already typed one command to check the version. Let’s go one small step further and actually talk to Python. In your terminal (Command Prompt on Windows, Terminal on macOS and Linux), type python on Windows or python3 on macOS and Linux, and press Enter.
Something changes. The prompt you were used to disappears and three angle brackets show up instead:
Python 3.13.1 (main, Dec  3 2024) on win32
Type "help", "copyright", "credits" or "license" for more...
>>>
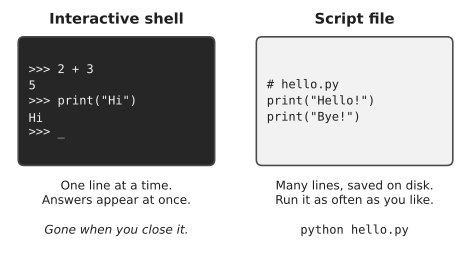
Those three brackets, >>>, mean you’re no longer talking to your computer in general. You’re talking to Python directly. This is called the interactive shell, and people also call it the REPL, which stands for read, evaluate, print, loop. It reads what you type, works out the answer, prints it, then waits for more. Try it:
>>> 2 + 3
5
>>> print("It works!")
It works!
You just ran Python code. Two lines, nothing glamorous, but that’s a real conversation with a real programming language. The shell is a scratchpad, the kind of place where you try out an idea before committing it to paper. When you want to leave, type exit() and press Enter, and you’ll be back at your normal prompt.
#Your code editor: VS Code
The shell is lovely for experiments, but it forgets everything the moment you close it. For anything you want to keep, you’ll write your code in a file. And to write files comfortably, you need a code editor.
Could you use Notepad or TextEdit? Technically, yes. It’s a bit like writing an essay with a pencil that has no eraser. A real code editor colours your code so you can see its structure, lines up your indentation for you, points out typos before you even run anything, and runs your program with one click. Programmers also talk about an IDE, an integrated development environment, which is simply an editor with extra tools built in, such as a debugger. The line between the two is blurry, and you don’t need to worry about it.
You’ll hear about several popular choices, so here’s a quick map:
| Editor | What it’s like | Good for |
|---|---|---|
| VS Code | free, fast, works for any language | almost everything; the one this book uses |
| PyCharm | a full IDE made just for Python | large Python projects; has a free version |
| Jupyter / Google Colab | code in “cells” mixed with notes | data analysis and charts; Colab runs in a browser |
| IDLE | very simple; comes with Python | quick experiments when nothing else is installed |
| Thonny | simple, made for beginners | first steps, especially for younger learners |
| Spyder | looks like a scientist’s workbench | data and science work |
All of them run the same Python. Code you write in one works in the others, so this isn’t a decision you can get wrong forever. But a book has to pick one so that every instruction is exact, and this book uses Visual Studio Code, usually called VS Code. It’s free, it runs on Windows, macOS and Linux, and it’s one of the most widely used editors among professional programmers, so nothing you learn in it will be wasted.
Installing VS Code
- Go to code.visualstudio.com and download the version for your system. The website usually detects it for you.
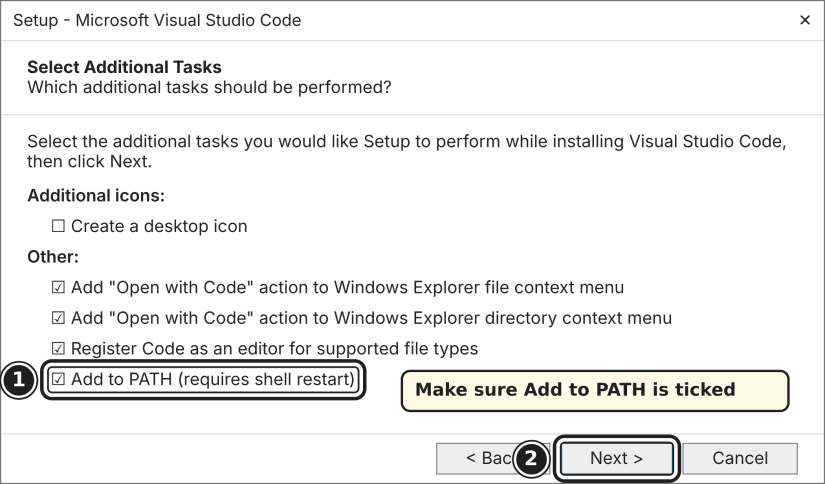
- Windows: run the installer, accept the licence and keep clicking Next. On the “Select Additional Tasks” screen (Figure 2.8), make sure Add to PATH is ticked (it usually is) and, if you like, the two Open with Code options, which let you right-click a folder and open it in VS Code. macOS: open the downloaded file and drag Visual Studio Code into your Applications folder. If you just double-click it in Downloads instead, it’ll work today and confuse you next week. Linux: download the
.debfile (Ubuntu and similar) or.rpmfile (Fedora and similar) and open it with your software installer.
- Open VS Code. It may show a welcome page; you can close it.
Adding the Python extension
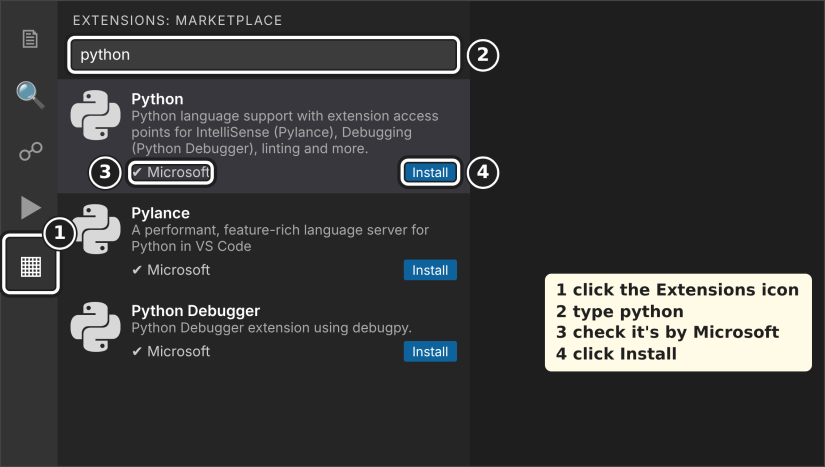
On its own, VS Code knows how to edit text, but not how to run Python. That comes from an extension, an add-on that teaches VS Code a new skill. Figure 2.9 shows the four clicks. Click the Extensions icon in the strip on the left side (it looks like four little squares, one of them slightly apart), type python in the search box, check that the first result is published by Microsoft, and click Install. It brings a few helpers, such as Pylance and the Python Debugger, along with it automatically. That’s all the setup VS Code needs.
A quick tour
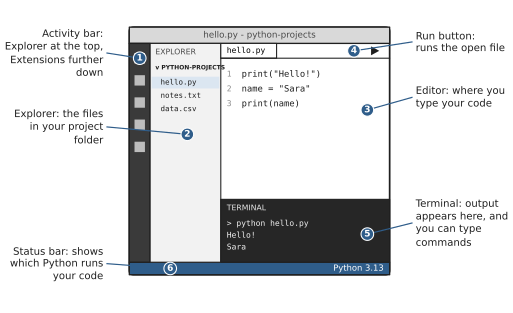
Figure 2.10 shows the parts of the VS Code window you’ll use in this book.
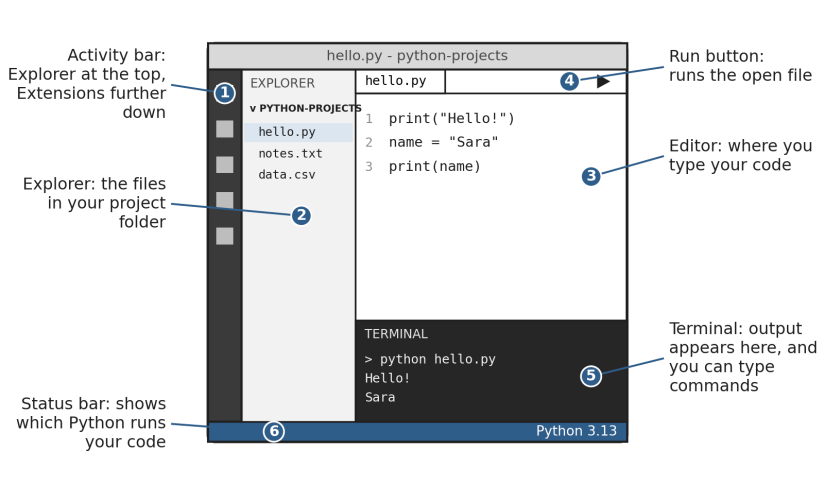
The activity bar (1) is the thin strip of icons on the far left. The top icon opens the Explorer (2), which lists the files in the folder you’re working in. You’ll open files by clicking them there. The big area in the middle is the editor (3), where you type. When a Python file is open, a small triangle, the Run button (4), appears near the top right. Clicking it runs the file, and the output appears in the terminal (5) at the bottom. The terminal is also where you’ll type commands, as you’ll see later in this chapter. Finally, the status bar (6) along the bottom edge shows, on the right, which Python VS Code is using. That small piece of text matters more than it looks, as you’re about to see.
Two settings make life easier, so switch them on now. Open the File menu and click Auto Save, so your work is saved as you type; forgetting to save, then running the old version of a file, is one of the most common reasons beginners think their change “didn’t work”. And if the text is too small, View > Appearance > Zoom In (or Ctrl and + on Windows and Linux, Cmd and + on a Mac) makes everything bigger.
Choosing which Python VS Code uses
A computer can have more than one Python on it. macOS often comes with one for its own use, some apps install their own, and later in the book you’ll create private copies on purpose. VS Code needs to know which one to use. Usually it picks the one you just installed, but it’s worth checking once.
Look at the right-hand side of the status bar. When a Python file is open, it shows a Python version, such as 3.13.2. If it doesn’t, or if the version isn’t the one you installed, open the Command Palette, a search box for every VS Code command: press Ctrl+Shift+P (or Cmd+Shift+P on a Mac), type Python: Select Interpreter, press Enter, and choose the Python you installed from the list. (“Interpreter” is just the official name for Python itself, the program that runs your code.)
#Running Python for the first time
Let’s write a program you can keep. First, make a folder somewhere easy to find, such as your Documents folder, and call it python-projects. Everything you build in this book can live there.
Figure 2.11 shows the five steps you’re about to take. You’ll repeat them, in this order, for every project in the book, so it’s worth getting comfortable with them now.
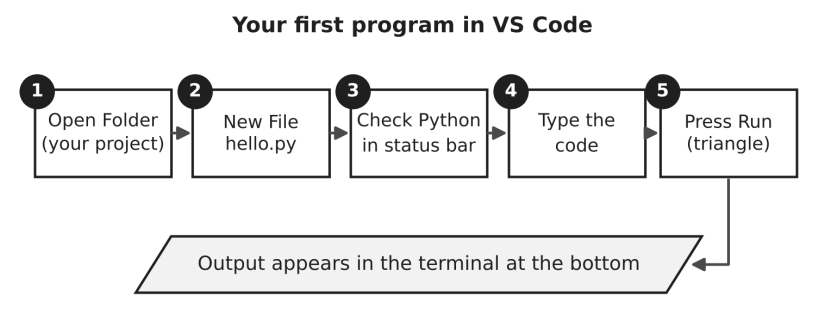
Open VS Code, choose File > Open Folder, and pick your new folder. (If VS Code asks whether you trust the authors of the files in this folder, choose Yes. They’re your files.) Then choose File > New File, pick Python File if it asks, and save it straight away as hello.py. That .py ending matters. It’s how both you and your computer know the file holds Python code, in the same way .jpg tells you a file is a photo.
Always open the folder, not just the file. When VS Code knows which folder you’re working in, its Explorer, its terminal and its Run button all start from the right place, and a whole family of “file not found” problems never happens.
Now type this into the file:
1print("Hello! This is my first Python program.")
2print("I wrote this, and the computer listened.")
Save the file. To run it, click the small triangle (the Run button) near the top right of VS Code. A panel opens at the bottom of the window and you should see your two lines appear:
Hello! This is my first Python program.
I wrote this, and the computer listened.
Take a second with that. Those words appeared because you told the computer to put them there. Every app you’ve ever used, however complicated, began with someone doing exactly what you just did.
You can also run the same file without the Run button, straight from a terminal, which is worth knowing because it’s how most automation scripts are run in real life. In a terminal that’s sitting inside your project folder, type:
python hello.py
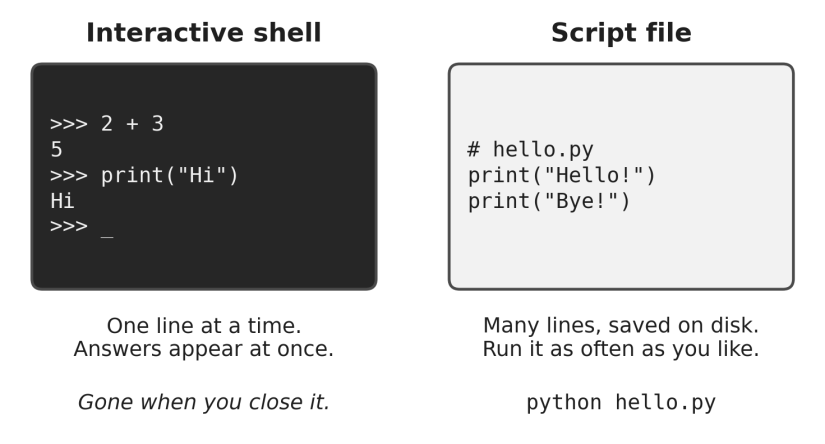
On macOS and Linux, use python3 hello.py. Same result, different door. If you see can't open file ... No such file or directory, the terminal is standing in a different folder from your file. In VS Code’s terminal that rarely happens, because it starts in the folder you opened; elsewhere, use cd to move into the right folder first, which the next section shows you how to do. Figure 2.12 shows the difference between talking to Python in the shell and handing it a whole file.
#Terminal basics (just enough)
The terminal scares people because it’s so bare. No buttons, no icons, just a blinking cursor waiting for you to know what to type. But you only need a handful of commands to feel at home, the same way you can get around a foreign city with “hello,” “thank you,” and “where is the station?”
The first idea is that the terminal is always standing inside some folder. Think of it as your current location. When you open a new terminal, you usually start in your home folder. To see where you are right now, type pwd on macOS or Linux, or cd on its own on Windows. To list what’s in the folder, type ls on macOS or Linux, or dir on Windows.
To move into a folder, use cd, which stands for change directory:
cd Documents
cd python-projects
And to go back up one level, to the folder that contains the one you’re in, type cd .. (that’s cd, a space, and two dots). That’s it. Where am I, what’s here, go in, go back. With those four moves you can reach any file on your computer.
One more tip that feels like a magic trick the first time: when typing a file or folder name, type the first few letters and press the Tab key. The terminal fills in the rest for you. It’s faster, and it means fewer typos, which brings us neatly to errors.
#Understanding errors calmly
You’re going to see errors. Let’s see one now, on purpose, while nothing is at stake. Open hello.py and change the first line so that print is misspelled:
1prnt("Hello! This is my first Python program.")
Save it and run it. Python responds with something like this:
Traceback (most recent call last):
  File "/Users/sara/python-projects/hello.py", line 1, in <module>
    prnt("Hello! This is my first Python program.")
    ^^^^
NameError: name 'prnt' is not defined. Did you mean: 'print'?
At first glance it looks like a wall of complaint. Read it from the bottom up, though, and it’s surprisingly kind. The last line says what went wrong: Python has never heard of anything called prnt. It even suggests what you probably meant. The lines above tell you where: the file name and line 1. The little arrows point right at the trouble.
So an error message is really three answers in one: what happened, where it happened, and often a hint about why. You’ll get better at reading them with every chapter. For now, fix the spelling, run it again, and enjoy watching it work.
Let’s break it one more way. Remove the closing quotation mark from the second line:
1print("I wrote this, and the computer listened.)
This time Python complains before running anything at all, with a SyntaxError. Remember from Chapter 1 that Python first checks your grammar, and only then runs your instructions. A missing quote is like a sentence that opens a bracket and never closes it. Python can’t even start reading, so it stops and tells you which line confused it.
If you take one habit from this chapter, take that one. Most beginners see red text and immediately start changing things at random. Don’t. Read first. Nine times out of ten, Python has already told you the answer.
#Mini Project: Run Your First Python Program
Time to make something that’s a little more yours. Create a new file in your project folder called first_program.py, and type this in. Yes, type it, don’t copy and paste. Your fingers learn things your eyes skip over. Here it is:
1# first_program.py
2# My first real Python program: a tiny welcome card.
3
4print("==============================")
5print("   Welcome to my first program")
6print("==============================")
7
8name = input("What's your name? ")
9print("Nice to meet you,", name + "!")
10print("Today you ran a real Python program.")
11print("Tomorrow, who knows?")
The lines starting with # are comments. Python ignores them completely. They’re notes for humans, and you’ll see plenty of them in this book. The input() line is new. It pauses the program, shows a question, and waits for you to type an answer and press Enter. Whatever you type gets stored under the name name, which you can then use in the next line. We’ll talk properly about storing things in Chapter 3, so if that part feels like magic for now, let it be magic for a few more pages.
Run it. When it asks for your name, type it and press Enter. You should see something like this:
==============================
   Welcome to my first program
==============================
What's your name? Sara
Nice to meet you, Sara!
Today you ran a real Python program.
Tomorrow, who knows?
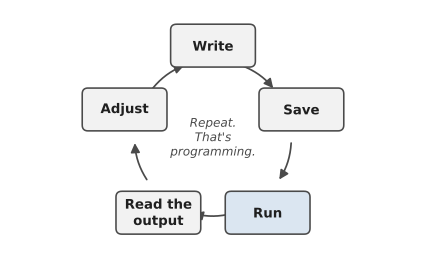
Now play with it. Change the messages. Add a line that asks for your favourite food and prints it back. Break it on purpose and read the error. None of this can hurt your computer, and every little change teaches you something the text can’t. Figure 25.1 shows the loop you’ll go round thousands of times as a programmer, and you’ve just been round it for the first time.
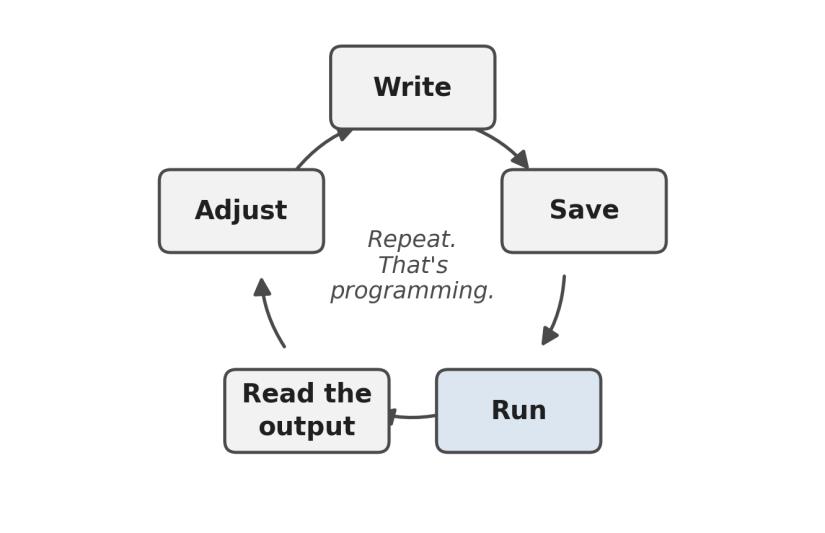
You installed a programming language, met the interactive shell, set up a proper editor, ran a script two different ways, learned your way around the terminal, and read your first error without panicking. That’s a big chapter. If any piece of the setup fought you, you’re in good company, because setup is often the hardest part of the whole journey, and it’s behind you now.
All the code from this chapter, and every chapter after it, is in the book’s code repository in a folder called chapter_02. Next, we’ll teach Python to remember things.
#On the Job
How it shows up at work: On your first day in almost any technical job, someone will hand you a laptop and a page of setup instructions: install this version of Python, clone this project, run this command. New starters who can work through that calmly, read the error messages, and ask a clear question when they’re stuck make a very good first impression. The terminal and the editor you met in this chapter are the tools you’ll use every single day.
What employers expect: Comfort, not mastery. You should be able to open a terminal, move between folders, run a script, check which Python version you’re using, and read an error message without panicking. That’s all, and you can already do it.
Interview questions you might meet:
- “How would you check which version of Python is installed?”
python --version, orpython3 --versionon macOS and Linux. A bonus point for mentioning that different projects can need different versions, which Chapter 23 deals with. - “Which editor or IDE do you use, and why?” There’s no wrong answer, but have a reason. “VS Code: it’s free, fast, works for every language, and it has a good Python extension and a built-in debugger and terminal” is a perfectly professional reply. Knowing that PyCharm and Jupyter exist, and what they’re good for, shows you know the landscape.
- “What is PATH?” A list of folders your operating system searches when you type a command. If Python’s folder isn’t on it, typing
pythondoesn’t work. Being able to explain a common setup problem shows you’ve actually solved one.
Portfolio task: Upload first_program.py to the learning-python repository you created in Chapter 1. On GitHub, open the repository, choose Add file > Upload files, and drag the file in. Chapter 30 points you towards learning Git properly, but uploading through the website is a perfectly good start.
Professional habit: Learn to ask for help well. When something doesn’t work, a good request includes four things: what you were trying to do, the exact command you ran, the full error message (copied as text, not a blurry photo), and your operating system and Python version. Colleagues answer questions like that quickly and happily. “It doesn’t work” gets you nowhere.
#Exercises
Try each exercise yourself before you look at the solutions, which are in solutions/chapter_02 in the book’s GitHub repository. Some answers are short explanations rather than code; those are collected in answers.md in the same folder.
Warm-up
Exercise 2.1. What do you type to check your Python version on Windows? And on macOS?
Exercise 2.2. You’re looking at a terminal and the prompt is >>>. Where are you, and how do you get out?
Exercise 2.3. Without running it, predict what this program prints. Then run it to check:
1print("2 + 3")
2print(2 + 3)
Exercise 2.4. This program has a bug. Find it, fix it, and say what error Python would have shown:
1prnt("Good morning!")
Practice
Exercise 2.5. Write a program that prints your name, your city, and your favourite food, each on its own line.
Exercise 2.6. Use Python as a calculator. Write a program that prints the number of hours in a year (365 days) and the number of minutes in a week.
Exercise 2.7. Write a program that prints a banner like this, with your own name inside:
**************
*  Hi, Sara  *
**************
Exercise 2.8. Write a program that asks for the user’s name and their favourite hobby, then prints a sentence using both.
Exercise 2.9. Using only the terminal, create a folder called practice, move into it, check where you are, and list what’s inside. Write down the commands you used.
Challenge
Exercise 2.10. Break hello.py in three different ways: misspell print, remove a closing bracket, and remove a closing quotation mark. For each, write down the last line of the error message and what it means.
Exercise 2.11. Write a program that draws a small house using only print() and characters like /, \, | and _.
Exercise 2.12. Write a program that asks for two words and prints them in the opposite order, with the word “and” in between. For example, tea and cake should print cake and tea.
Exercise 2.13. Get to know VS Code. Find the Python version in the status bar and check it matches what python --version (or python3 --version) says in VS Code’s terminal. Then open the Command Palette, run Python: Select Interpreter, and look at the list. How many Pythons does your computer have?